If you, like me, have some small open source projects or libraries, that you want to release to maven central, and you do not want to host your own CI environment, then this blog post might help. I mostly wrote it for myself (to remember) but I am sure it might be useful to others. All this information is somewhere on the internet, this blog just brings it together.
Context
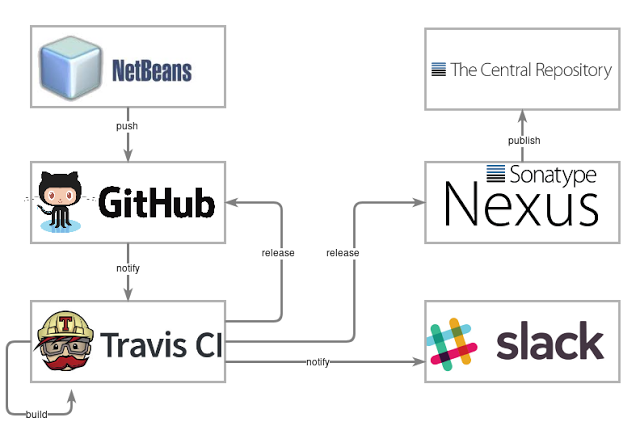
So you have some projects on you PC, coding in your favorite IDE (Netbeans in my case) and you can build your artifacts in maven. This blog will explain how to get from there via GitHub to build on Travis CI, create a release back into GitHub, release to Sonatype Nexus OSS and publish to the Central repository, and then send a slack notification.
I’ll be using one of my own projects as an example: https://github.com/phillip-kruger/apiee
GitHub
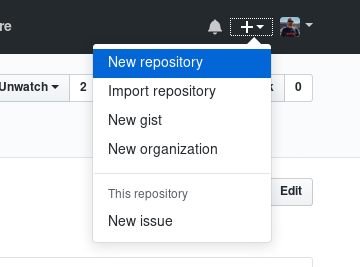
“GitHub is free to use for public and open source projects” - https://github.com/pricing So just head over to https://github.com/ and sign up. You can then create a new repository by clicking on the +
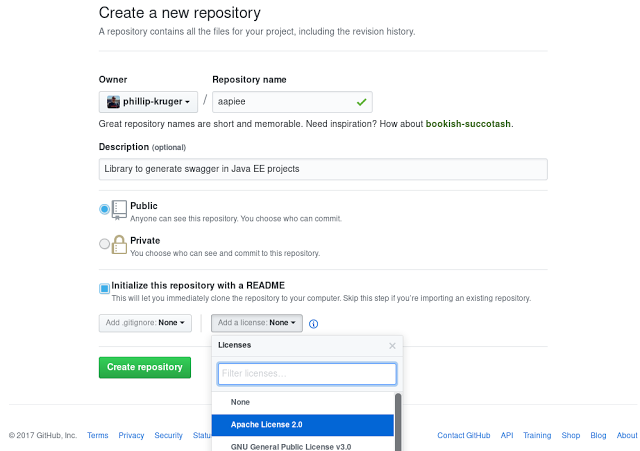
Remember to add an open source license :
You can now clone the repository and add your code to it.
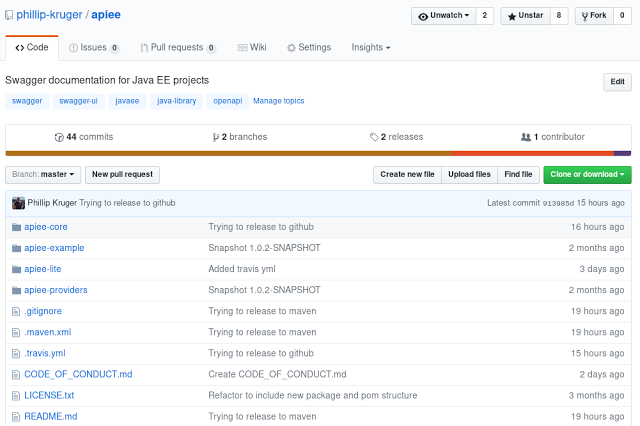
Pushing code to the upstream will make your code available in the GitHub page:
Add a README.md with some information about your project. GitHub also has a built-in wiki (example) to add more documentation about your project.
Some more info:
- https://guides.github.com/introduction/getting-your-project-on-github/
- https://guides.github.com/activities/hello-world/
Travis CI
“Easily sync your GitHub projects with Travis CI and you’ll be testing your code in minutes!” - https://travis-ci.org/
Adding Travis CI to Github is very easy, just go to the the GitHub marketplace, select “Continuous integration” and then “Travis CI” (or this direct link: https://github.com/marketplace/travis-ci)
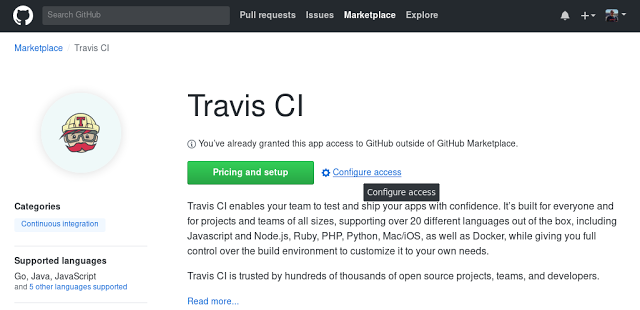
Click the Configure access and follow the instructions.
This will add Travis CI as an Installed GitHub App on your account:
https://github.com/settings/applications

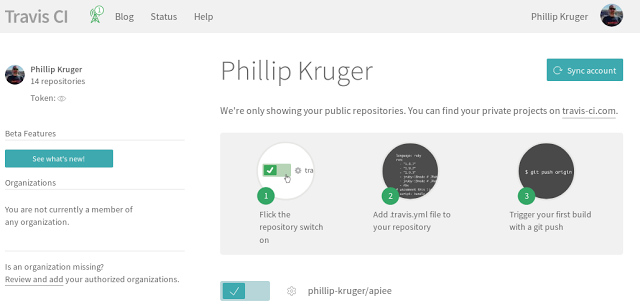
You can also now log into Travis CI using your GitHub account. You will then see all your public GitHub projects. Simply select the projects you want Travis to build for you:
Your initial build might fail, as you need a .travis.yml file in your project root.
In your project root
Add a .travis.yml file. For now we just want to tell Travis that we are using java:
language: java
commit and push the change.
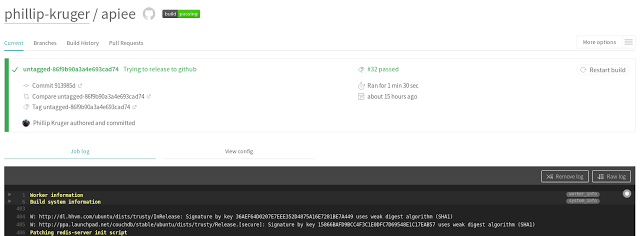
Because you have linked your GitHub to your Travis CI account, Travis will automatically kick off a build if it detects a change, you can see the result in your Travis project page:
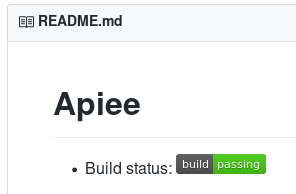
 You can now add the “build passing” image to your README.md or wiki page in your GitHub project, example:
Build status: [](https://travis-ci.org/phillip-kruger/apiee)
Then it’s easy to see the build status in GitHub:
Release back into GitHub
So now Travis built your project on every push. We can now setup Travis to create a release in GitHub for every build.
1) Get the project version:
In .travis.yml add the following:
before_deploy:
  - mvn help:evaluate -N -Dexpression=project.version|grep -v '\['
  - export project_version=$(mvn help:evaluate -N -Dexpression=project.version|grep -v '\[')
This will set the project version (as defined in your pom.xml) to an environment variable project.version
Some more info:
2) Install the travis client:
You need Ruby installed on your system to use the Travis client. In my case (Arch Linux) it’s as simple as:
sudo pacman -S ruby
Then you can install travis:
gem install travis
This will allow you to create some entries in your .travis.yml file.
You can test that the client installed correctly:
travis version
1.8.8
3) Create the release instruction:
To create the release part in your .travis.yml file, run the following command in the root of your project:
travis setup releases
You will be prompted for your GitHub username and password.
This will create the deploy part in your .travis.yml file:
deploy:
   provider: releases
       api_key:
           secure: **** (some long encrypted key)
       file:
           - apiee-core/target/apiee-core-$project_version.jar
           - apiee-providers/target/apiee-providers-$project_version.jar
           - apiee-example/target/apiee-example.war
       skip_cleanup: true
       on:
           repo: phillip-kruger/apiee
       name: $project_version
You can replace the version in the file with the $project_version variable as set above.
Also add a name for the tag. In my case I just used the project version. If the generated deploy part does not have the skip_cleanup part, add that.
Commit and push, this will kick of a build in Travis and a new release in GitHub after a successful build.
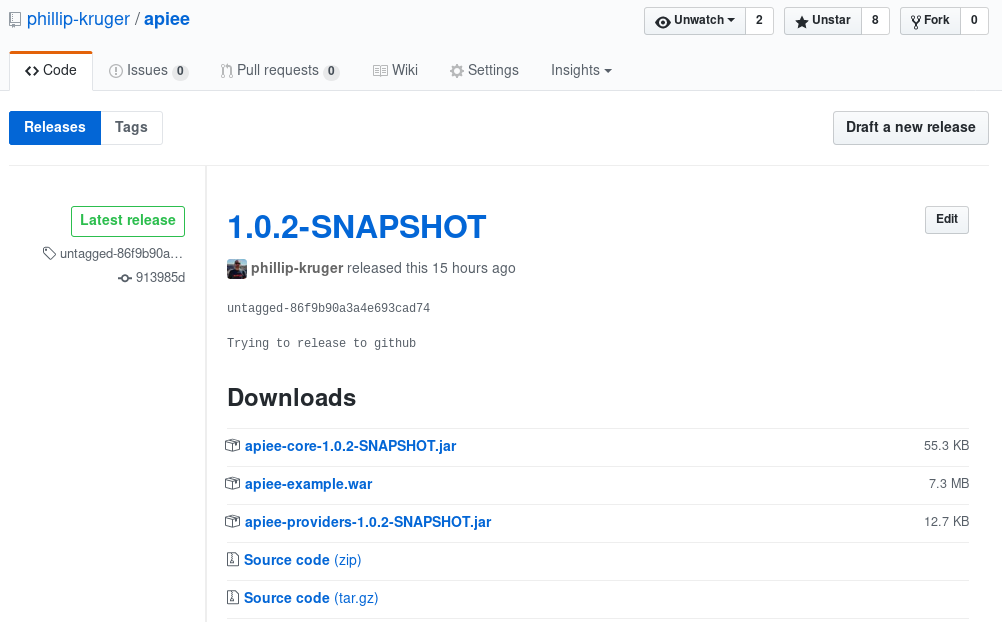
All the files as defined in .travis.yml will be available for download.
Some more info:
Sonatype Nexus OSS
There is no way (at least that I could find) to release directly to Maven Central from Travis CI. The way that we will do it is via Sonatype OSS and using maven.
To do this we need to to the following:
- Create a Sonatype User account.
- Make sure your Group Id and other pom details is correct.
- Create a GPG certificate.
- Add the necessary plugins to the
pom.xmlfile - Hook the maven profile build into Travis
1) Create a Sonatype User account
- Go to Create your JIRA account and create an account for yourself.
- Create a New Project ticket
Your Group Id has to be your GitHub profile (reverse domain)
Example, my GitHub Profile is https://github.com/phillip-kruger So my Group Id is com.github.phillip-kruger
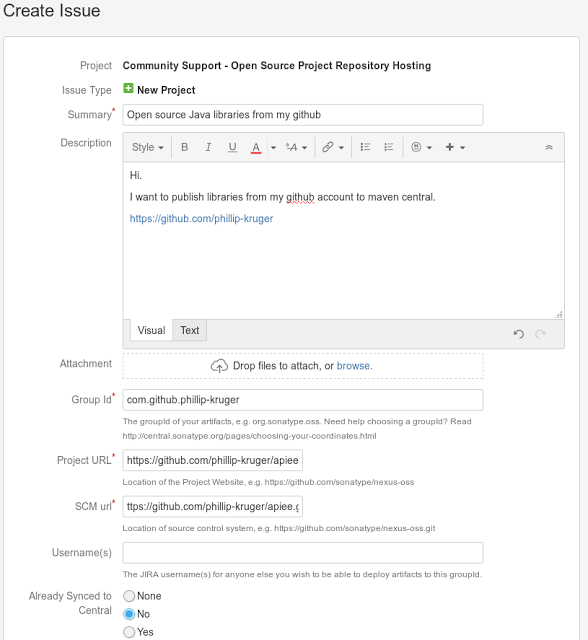
Just explain in the description that you want to publish your open source projects to Maven central.
“The initial setup for your OSSRH repository requires some manual steps and human review (see why), after which your deployment process is typically modified to get components into OSSRH. These are all one time steps.”
My original JIRA for reference: https://issues.sonatype.org/browse/OSSRH-32216
This takes a day or two, and then you can publish.
Some more info:
- http://central.sonatype.org/pages/ossrh-guide.html
- http://central.sonatype.org/pages/apache-maven.html
- https://dracoblue.net/dev/uploading-snapshots-and-releases-to-maven-central-with-travis/
2) Make sure your Group Id and other pom details is correct.
While you wait for the staff at Sonatype to get back to you, you can make sure your project is correct.
- Make sure you use the correct groupId in your
pom.xml, example:
<groupId>com.github.phillip-kruger</groupId>
Remember to update other references to your artifact in other poms or dependencies.
- Make sure your package base name reflect your group Id (optional)
package com.github.phillipkruger.apiee;
- Make sure your
pom.xmlinclude a licenses, scm, distributionManagement, developers section. Take note of the snapshotRepository and the repository. example:
<licenses>
    <license>
        <name>Apache License, Version 2.0</name>
        <url>http://www.apache.org/licenses/LICENSE-2.0.txt</url>
        <distribution>repo</distribution>
    </license>
</licenses>

<scm>
    <connection>scm:git:https://github.com/phillip-kruger/apiee.git</connection>
    <url>https://github.com/phillip-kruger/apiee</url>
</scm>

<distributionmanagement>
    <site>
        <id>api.wiki</id>
        <url>https://github.com/phillip-kruger/apiee/wiki</url>
    </site>

    <snapshotrepository>
        <id>ossrh</id>
        <url>https://oss.sonatype.org/content/repositories/snapshots</url>
    </snapshotrepository>
    <repository>
        <id>ossrh</id>
        <url>https://oss.sonatype.org/service/local/staging/deploy/maven2/</url>
    </repository>

</distributionmanagement>

<developers>
    <developer>
        <name>Phillip Kruger</name>
        <email>phillip.kruger@gmail.com</email>
        <organizationurl>http://www.phillip-kruger.com</organizationurl>
    </developer>
</developers>
Some more info:
- http://central.sonatype.org/pages/apache-maven.html
3) Create a GPG certificate
“One of the requirements for publishing your artifacts to the Central Repository, is that they have been signed with PGP. GnuPG or GPG is a freely available implementation of the OpenPGP standard”
Make sure GnuPG is installed on your system, example:
sudo pacman -S gnupg
Then you can generate a key:
gpg --gen-key
You should then see your key listed:
gpg2 --list-keys
Distribute your public key:
gpg2 --keyserver hkp://pool.sks-keyservers.net --send-keys C6EED57A
The –keyserver parameter identifies the target key server address and use –send-keys is the keyid of the key you want to distribute.
You can get your keyid by listing the public keys. (gpg2 --list-secret-keys)
Some more info:
- http://central.sonatype.org/pages/working-with-pgp-signatures.html
4) Add the necessary plugins to the pom.xml file
To let maven do the publish to Sonatype OSS, you need to add some plugins to your pom.xml:
- You need to generate javadoc
- You need to attach the source
- You need to sign the artifacts
- You need to release to Sonatype
I do this in a profile, so that I can build locally without having to do this, and then I can do a mvn clean install -Prelease if I want to release
Example:
<profiles>
  <!-- Activate using the release property: mvn clean install -Prelease -->
  <profile>
      <id>release</id>
      <activation>
          <property>
              <name>release</name>
          </property>
      </activation>

      <build>
          <plugins>
              <!-- To release to Maven central -->
              <plugin>
                  <groupid>org.sonatype.plugins</groupid>
                  <artifactid>nexus-staging-maven-plugin</artifactid>
                  <version>1.6.8</version>
                  <extensions>true</extensions>
                  <configuration>
                      <serverid>ossrh</serverid>
                      <nexusurl>https://oss.sonatype.org/</nexusurl>
                      <autoreleaseafterclose>true</autoreleaseafterclose>
                  </configuration>
              </plugin>
              <!-- To generate javadoc -->
              <plugin>
                  <groupid>org.apache.maven.plugins</groupid>
                  <artifactid>maven-source-plugin</artifactid>
                  <version>3.0.1</version>
                  <executions>
                      <execution>
                          <id>attach-sources</id>
                          <goals>
                              <goal>jar-no-fork</goal>
                          </goals>
                      </execution>
                  </executions>
              </plugin>
              <plugin>
                  <groupid>org.apache.maven.plugins</groupid>
                  <artifactid>maven-javadoc-plugin</artifactid>
                  <version>2.10.4</version>
                  <executions>
                      <execution>
                          <id>attach-javadocs</id>
                          <goals>
                              <goal>jar</goal>
                          </goals>
                      </execution>
                  </executions>
              </plugin>

              <!-- To sign the artifacts -->
              <plugin>
                  <groupid>org.apache.maven.plugins</groupid>
                  <artifactid>maven-gpg-plugin</artifactid>
                  <version>1.6</version>
                  <executions>
                      <execution>
                          <id>sign-artifacts</id>
                          <phase>verify</phase>
                          <goals>
                              <goal>sign</goal>
                          </goals>
                      </execution>
                  </executions>
              </plugin>
          </plugins>

      </build>
  </profile>
</profiles>
To run this on your local PC, you also need to add this to your maven settings.xml:
<settings>
    <servers>
        <server>
            <id>ossrh</id>
            <username>your-jira-id</username>
            <password>your-jira-pwd</password>
        </server>
    </servers>
    <profiles>
        <profile>
            <id>ossrh</id>
            <activation>
                <activeByDefault>true</activeByDefault>
            </activation>
            <properties>
                <gpg.executable>gpg2</gpg.executable>
                <gpg.passphrase>your-gpg-pwd</gpg.passphrase>
            </properties>
       </profile>
    </profiles>
</settings>
Replace your-jira-id and your-jira-pwd with your own sonatype jira id and your-gpg-pwd with the one created above.
5) Hook the maven profile build into Travis
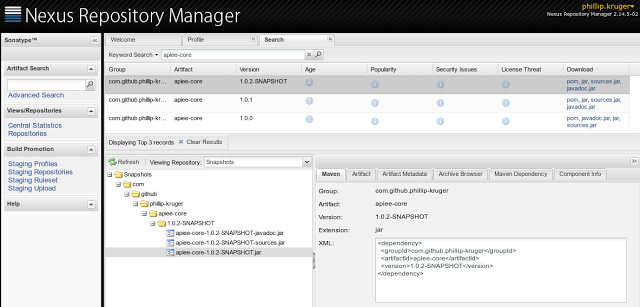
Once the staff at Sontype got back to you w.r.t your account, you should now be able to release to maven using the release maven profile:
mvn clean install -P release
You will then see the artifacts in Sonatype OSS, example: https://oss.sonatype.org/#nexus-search;quick%7Eapiee-core
It takes a few minutes before you will see it in Maven Central, example: http://search.maven.org/#search%7Cga%7C1%7Ca%3A%22apiee-core%22
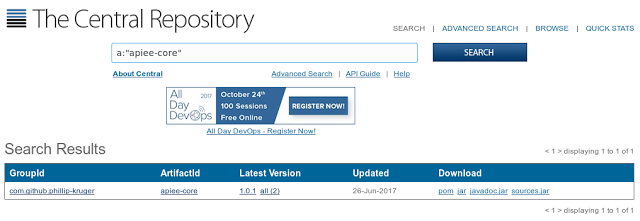
This also means your artifact can now be included in any pom.xml !!
<dependency>
    <groupid>com.github.phillip-kruger</groupid>
    <artifactid>apiee-core</artifactid>
    <version>1.0.1</version>
</dependency>
Now make it part of the Travis CI Build:
Create a maven settings file that we can distribute with the project, that contains all the things we added to your local settings.xml
In the root of your project, add a .maven.xml file:
<settings xmlns:xsi="http://www.w3.org/2001/XMLSchema-instance" xmlns="http://maven.apache.org/SETTINGS/1.0.0" xsi:schemalocation="http://maven.apache.org/SETTINGS/1.0.0
                      http://maven.apache.org/xsd/settings-1.0.0.xsd">
    <servers>
        <server>
            <!-- Maven Central Deployment -->
            <id>ossrh</id>
            <username>${env.SONATYPE_USERNAME}</username>
            <password>${env.SONATYPE_PASSWORD}</password>
        </server>
    </servers>

    <profiles>
      <profile>
        <id>ossrh</id>
        <activation>
          <activeByDefault>true</activeByDefault>
        </activation>
        <properties>
          <gpg.executable>${env.GPG_EXECUTABLE}</gpg.executable>
          <gpg.passphrase>${env.GPG_PASSPHRASE}</gpg.passphrase>
        </properties>
      </profile>
    </profiles>
</settings>
This will now be available when you push your code and you can reference it from the .travis.yml
We need to define the variables that we used above in the .maven.xml file on the Travis CI site.
To hide your Sonatype username from Travis, log into Sonatype OSS Nexus and go to your profile and select User token:
example: https://oss.sonatype.org/#profile;User%20Token
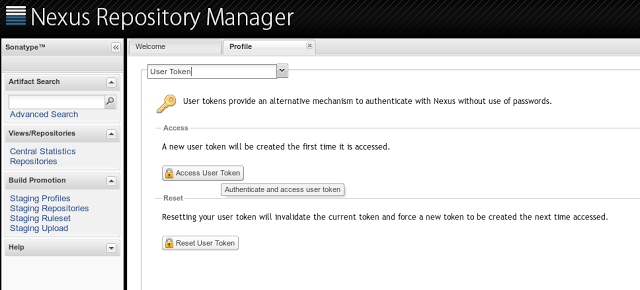
Click on “Access User Token” to get a user token.
This will give you values to use in the SONATYPE_USERNAME and SONATYPE_PASSWORD values.
GPG_EXECUTABLE will be gpg and GPG_PASSPHRASE will be your GPG password you create above at “Create a GPG certificate”.
In the settings of your Travis CI project add the following environment variables: example: https://travis-ci.org/phillip-kruger/apiee/settings
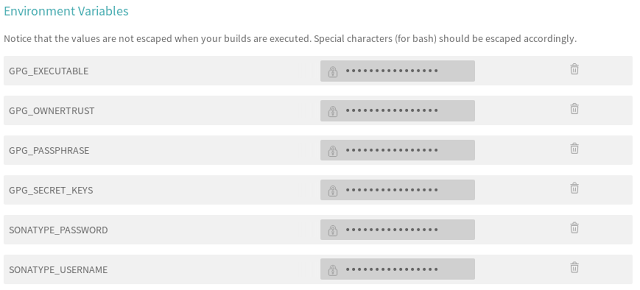 (We will add the GPG_OWNERTRUST and GPG_SECRET_KEYS later)
What about the local GPG certificates ?
On your local PC you have create the GPG certificates that allow you to sign the artifacts when building. We now need to transfer these to Travis CI so that the build there can do the same. To do that we need to create base64 encoded values of the secrets and add them to Travis CI as environment variables.
On cmdline:
gpg -a --export-secret-keys <your-email-address> | base64 -w 0
Add the output to a env variable called GPG_SECRET_KEYS in Travis CI as described above.
Do the same for Owner trust:
gpg --export-ownertrust | base64 -w 0
Add the output to a env variable called GPG_OWNERTRUST in Travis CI.
Update the .travis.yml
We can now update the .travis.yml file to build using our defined maven profile.
First we need to export the GPG details:
## export GPG details
before_install:
    - echo $GPG_SECRET_KEYS | base64 --decode | $GPG_EXECUTABLE --import
    - echo $GPG_OWNERTRUST | base64 --decode | $GPG_EXECUTABLE --import-ownertrust
This will make the GPG details that we added as env variables available in the build. Travis will replace GPG_SECRET_KEYS and GPG_OWNERTRUST with the correct values.
We then define the build commands that Travis use, so that we can pass in our settings file and define the profile to use
install:
    mvn --settings .maven.xml install -DskipTests=true -Dgpg.skip -Dmaven.javadoc.skip=true -B -V

## Build and release to maven central
script:
    mvn clean deploy --settings .maven.xml -DskipTests=true -B -U -Prelease
Commit and push
This should do it. If you commit and push your code that contains your new .maven.xml and changes to .travis.yml, your build will now run under the release profile that publish to maven central.
Slack
Lastly, if you want to get a slack message on a build you can simply sign up for a slack account at https://slack.com/
“Free for small teams wanting to try out Slack for an unlimited period of time.” - https:/www.slack.com/pricing
After your setup you can create a channel for build notifications. I called mine #travis.
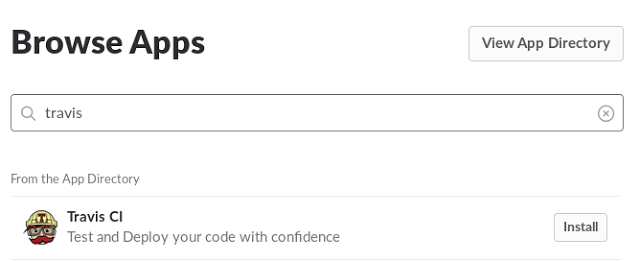
In your slack menu (on the left) Select the + next to Apps to browse and search for apps. Find the travis app and install it.
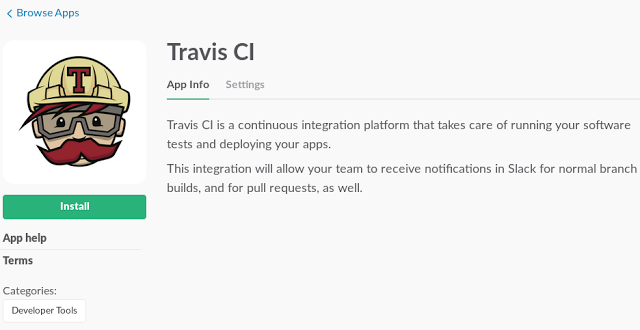
You can then select the channel you created earlier.
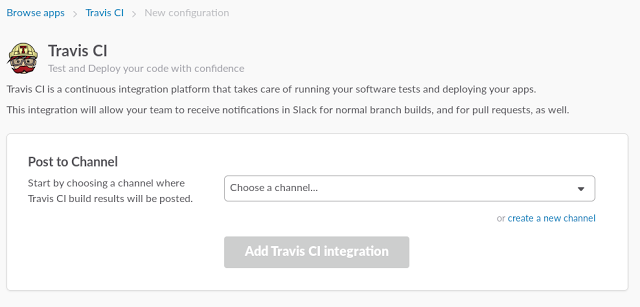
You will then see instructions on how and what to add to your .travis.yml file.
notifications:
    email: false
    slack:
        secure:<some-key>
Commit your change and soon you will get the notification !
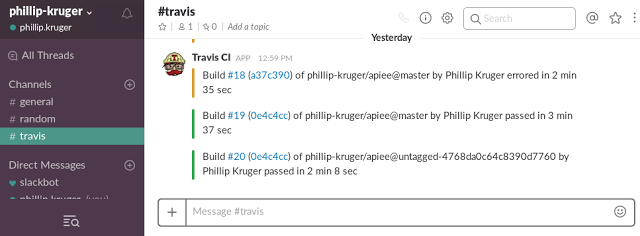
That’s it. Now when you commit and push your code to GitHub, it will create a release in GitHub, publish to SonaType OSS Nexus and release to Maven Central, before sending you a slack message.
You can see the final .travis.yml and .maven.xml file in the Apiee Github page: